Tonight I had a chance to share some new things I've been experimenting with on a webinar with my Mom,
DearMYRTLE. Did you know that you can create custom Google maps? With a custom Google map, you can share pictures, links & docs linked to physical street addresses. You can create walking/driving tours, share stories with your extended family ... the possibilities are endless.
To start, you'll want to make sure you are logged into your google account. If you don't have one, create one. Now. It's free and there's a whole world waiting for you!! ;)
Now go to
www.maps.google.com & click on "My Places":
Next click on "Create Map":
Enter a Title, Description & choose your privacy setting. You may also choose to "collaborate" (you can invite others to view and/or edit your map). Click "save" when you're done:
Your new map now shows when you click on "My Places". Select your new map to view it and edit:
Here you can view any markers or routes that have been placed. To edit or add markers, click the "edit" button:
In edit mode, type the address you would like to find in the search bar:
Once you have selected the proper address, zoom in on the location. The select the blue pin ("Add a placemark"):
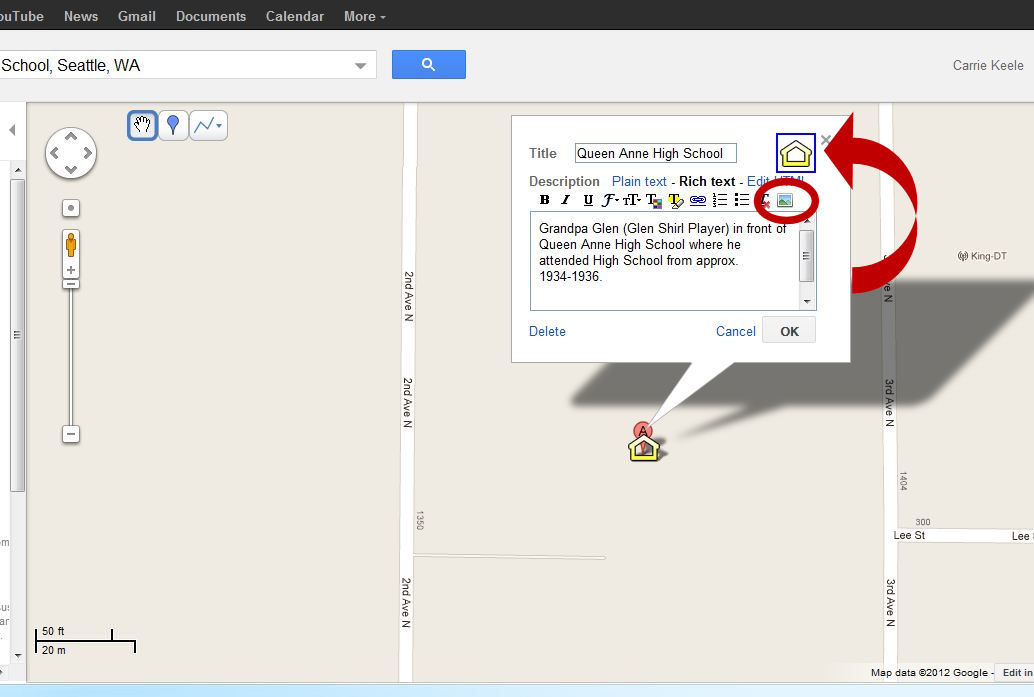
Place your pin next to the original Google maps pin. A window will pop up allowing you to add some details. You can change to look of the pin (here I changed the pin to a yellow school house) by clicking on the icon and selecting from the available icons. You can type text using "plain text", but I prefer using "rich text" format since it gives you more options. Once you have the text you would like, you can add a picture by clicking picture icon (circled below):
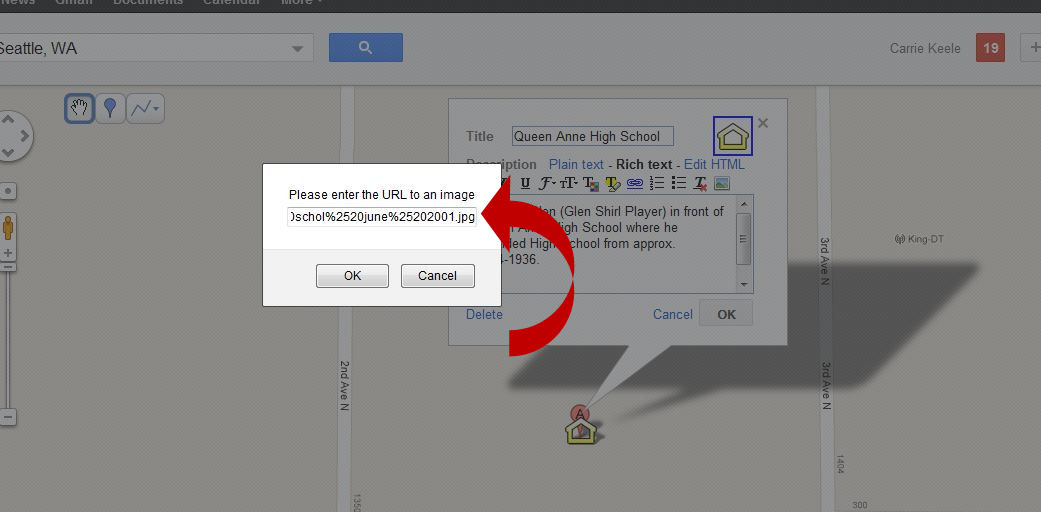
Copy the URL of the picture you are using into this box. Note: You cannot upload a picture directly from your computer. You can use your own website or a free picture hosting site. In this example I used Picasa, which is also a Google product. Make sure the link is directly to the picture, not a webpage. I usually right-click the picture and select "Copy Image Location" to ensure I have the proper link.
You will see that the picture now shows up in the white box. One of the restrictions I noticed, is that within your custom map, you can't make these pictures bigger. I like to have details and be able to zoom in. So, I opt to link this picture to my Picasa album where they can view the full picture, save it, print it, etc. Simply click on the picture and then click the "link" button (looks like a chain link):
From here copy the URL to the web location of the picture. For this example, I used the URL to my Picasa album that shows this picture (rather than the image location). This will give me the ability to see all pictures in the album, not just the one picture.
Once you have all the information added, click the "OK" button, then click "Save". Now click "done" to see what your custom map now looks like:
Here you can see that our new pin now shows up in the list. Make sure to check to see if you image link works correctly.
If you'd like to take a close look at what I have added to my map, here it is:
My Custom Map.
You can create different maps for ancestors, time periods or locations. Imagine sharing this with your family and inviting them to share their pictures & stories. My 6 year old son, Braden, thinks that maps are the coolest thing (he collects maps from the local malls & often will navigate to the next store when we are shopping!) ... I can't wait to share my custom map with him & tell him stories about Grandpa Glen!
Carrie Keele
(a.k.a.
DearMYRTLE's daughter)
www.NotYourMothersGenealogy.com